Navigating around the UI screen
This chapter describes all the visual elements of Trivore Identity Service.
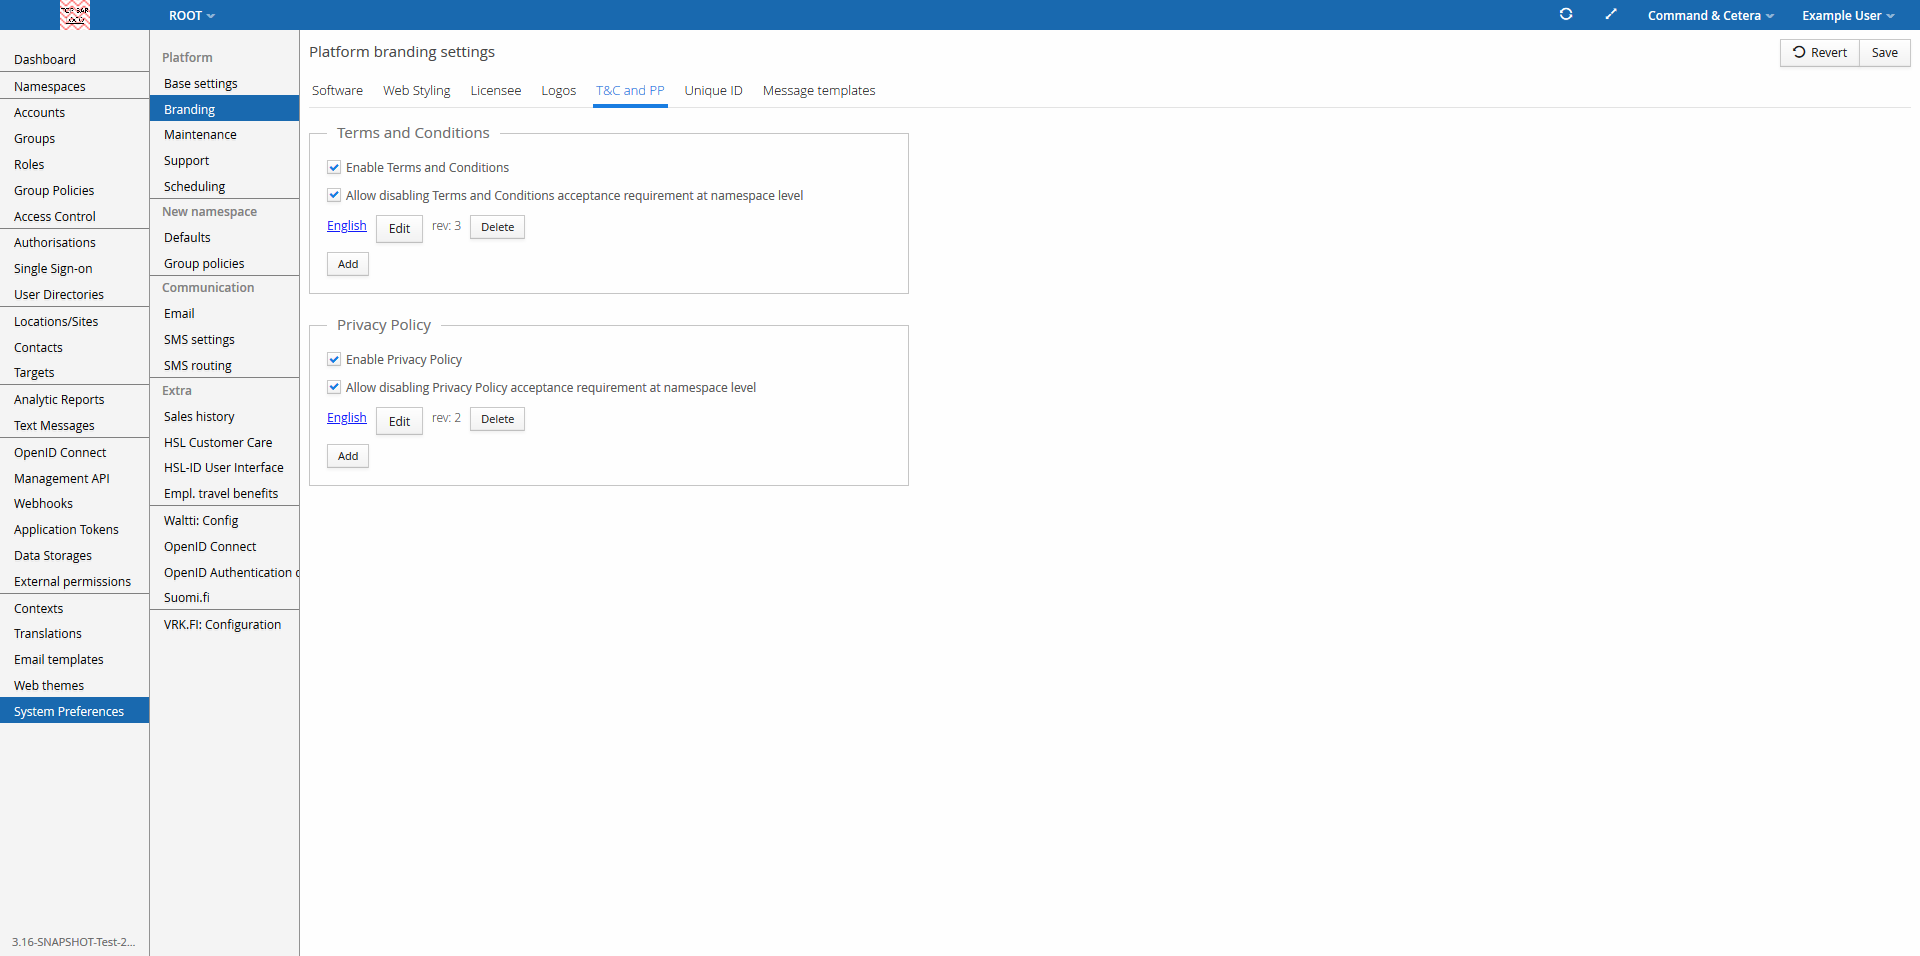
Full screen view with all menu items and menu levels shown
Above is the System Preferences > Branding view seen on Main Pane. There are many elements on screen we need to familiarise ourselves with.
-
Logo (which is by default) on the top corner of the screen. As the language here is English, a LTR language, the logo is on the top left corner.
-
Main Menu is the Left Pane below the logo on LTR language user interface. On RTL language user interface the pane is called Right Pane, and it is on the right end of the screen below top right corner logo.
-
Top Bar is the thin horizontal line containing logo and some other key elements of the user interface. From left to right, Top Bar includes:
-
Logo, which is usually the name of the solution/product/platform, or the logo of the organisation of the signed-in user account.
-
Namespace Menu shows the name of the currently active namespace. Some user accounts may be allowed to switch from namespace to another. Most user accounts only see their own namespace name here.
-
Refresh (O) button to refresh or reload the content on screen. In some cases this button is missing on purpose.
-
Maximise/Restore (/) button to maximise the web browser to full screen and to restore it to its original size. Chrome browser is known to have issues with this feature on some systems.
-
Context Menu allows switching contexts. Contexts are covered later in this guide. You can think of a Context as a solution, service, or an application. It is possible for portal administrators to disable contexts. In that case this menu item might not be shown.
-
Personal Menu. The text shown is the full name of the currently signed in user account. That is, normally you would see your own name here.
-
-
Mid Pane is a second level menu next to the Main Menu and visible only after selecting System Preferences. It is a form of sub menu to the Main Menu. Most users will never see or need it as it is for system administrative use only.
-
Main Pane is the largest area on screen, where the actual application content is.
Next sections cover some of the more complex items in more detail. Main Menu is covered in next chapter.
Namespaces Menu
This menu is located next to the Top Bar logo. Accounts with a special role Multi-namespace may manage multiple namespaces. This menu allows for them to switch from namespace to another for easy and intuitive management.
This menu is shown as a drop-down only to users holding the role of Multi-namespace. Others will see their own namespace name here.
Context Menu
Context menu on Top Bar allows for switching from current application context to another one. Contexts are Trivore Identity Service integrated custom applications used for line-of-business purposes. A customer care application, or a MyData solution are examples of such applications. Contexts have their own Main Menu structure. Only the Top Bar is common between applications.
This functionality mostly available and used by administrators, not ordinary users. Trivore identity service is normally one of the applications available in Context Menu. If the default application for namespace is not Trivore Identity Service, then the functionality in Trivore Identity Service is very limited and contains only personal settings management.
Personal Menu
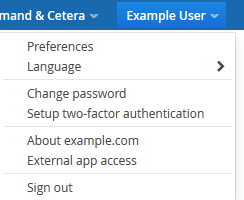
Open the Personal Menu by selecting your name in the Top Bar. The following functions are normally available:
-
Preferences for reviewing and changing personal information stored in Trivore Identity Service.
-
Language, allowing a user to change the display language quickly.
-
Change password to change the password, as the title suggests.
-
Setup two-factor authentication allows for enabling additional security to the sign in process. It is strongly recommended to enable two-factor authentication. Some organisations might even require enabling it.
-
About (Website address) opens a dialogue to view information on licensee, optional conformance, version number, and other related information.
-
External app access, opens a dialogue to view information about external applications access to your account.
-
Sign out does what it implies. Selecting it signs the user account out from Trivore Identity Service, and logs the action to Event Log for auditing purposes. Signing out via this menu selection is the only proper method. Sign out closes all Trivore Identity Service sessions in the same browser excluding possible incognito browser windows. Closing browser tab or window does not sign you out from Trivore Identity Service
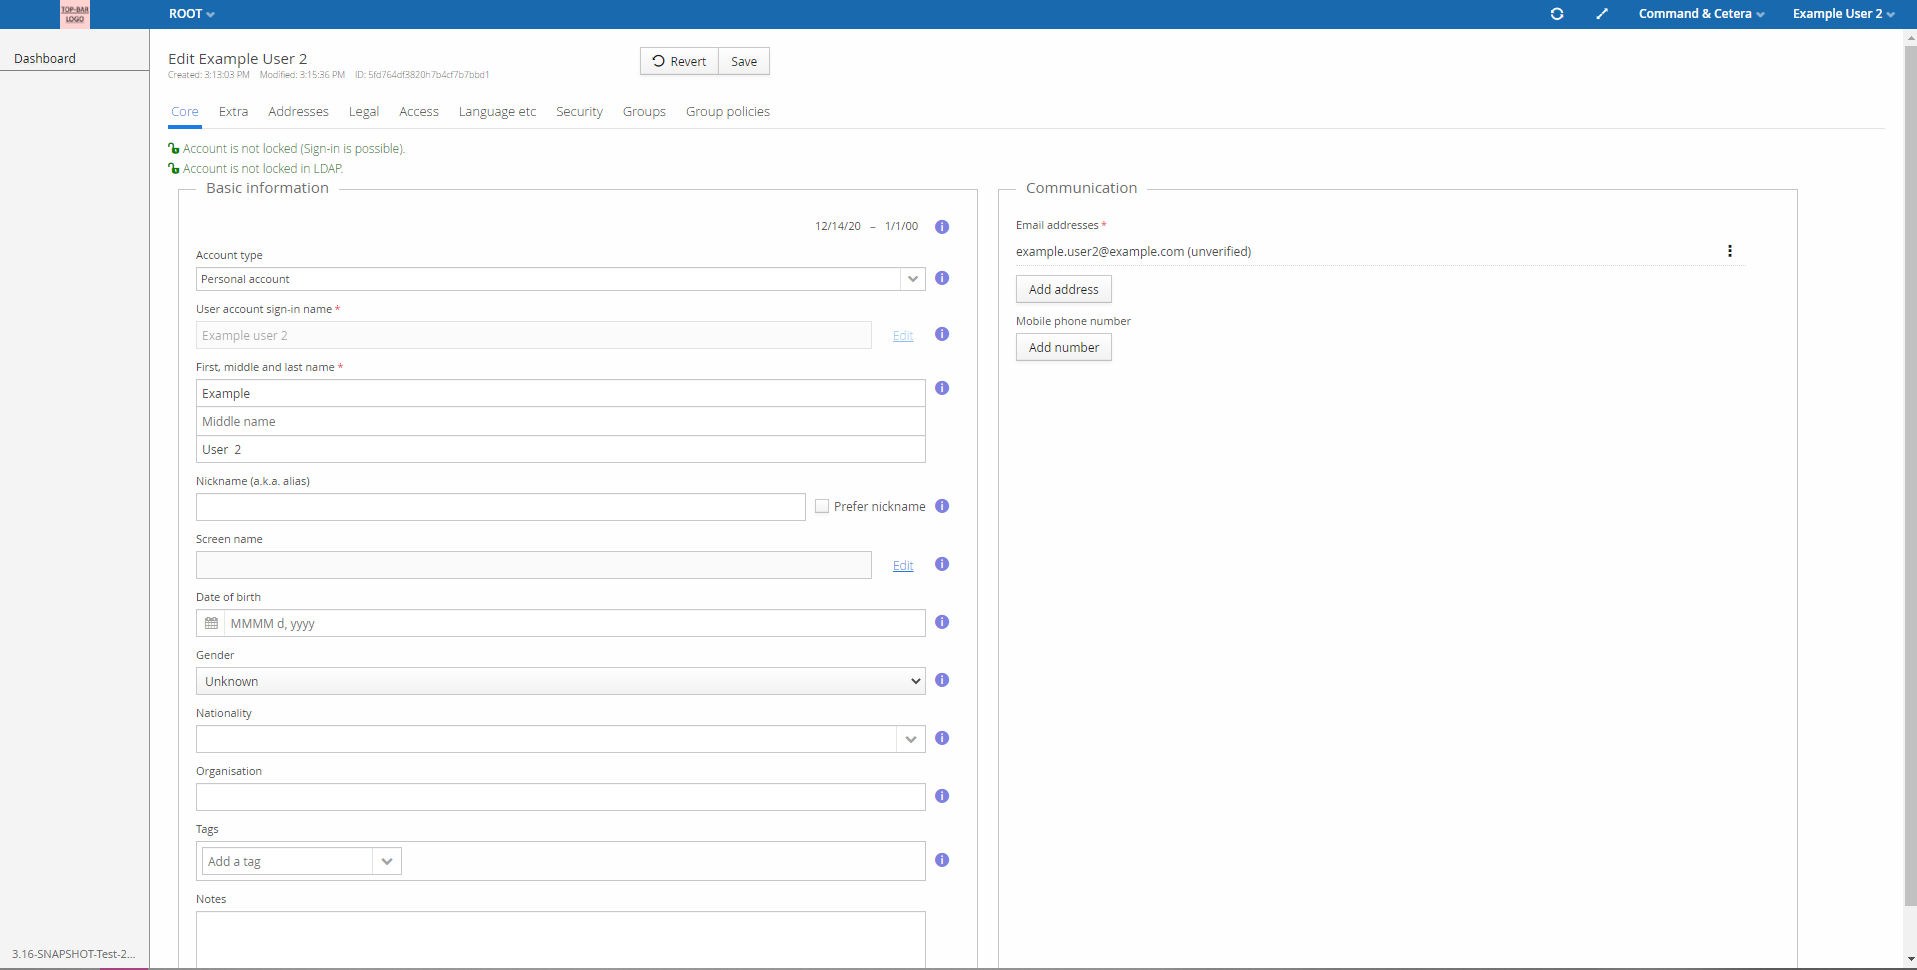
As can be seen on this image, the Main Menu of a “normal” user account on Trivore Identity Service Context is by default just the “Dashboard”.
Preferences
Preferences is the tool for each user to manage the data Trivore Identity Service has. It is possible to change some of the personal information, but not all. Please note the info buttons for help on each selection.
Data is divided in to tabs. You can switch from Core tab to the other tabs by just selecting the tab names. The other tabs have mostly view-only information on your account, such as information on account group memberships, account roles, and security related information.
It is a common use case to have a separate external application or website to manage personal data. Depending on business decisions, more or less personal data may be changed there.
It is possible to fully disable sign in access to Trivore Identity Service web user interface. That would obviously also make it impossible to see this view. External application or website is then required.
Language
The language drop down menu allows the user to quickly change the interface language of Trivore Identity Service. Upon selecting a language the website will reload and all the text will have been localised to the selected language.
Change password
Password changing is a common task for all user accounts. It is important to have a good long passphrase. It forms the basis for all protection and account security. It is important to know that the length of password is generally much more important than the complexity of characters used.
In the change password dialogue you might have to enter your old password. You will have to enter your new password and verify it by typing it again. You also have the option to allow Trivore Identity Service to automatically generate a new password for you, the generated password will follow your organisation's security preferences.
Depending on organisation policy, the about 10 different factors affecting the password can be set to many different values (your personal values can be reviewed in your Preferences on tab Security – see section above). These security settings are set and enforced to be the same for all or most user accounts in the namespace by a set of Group Policies. Please consult your internal service desk for your local requirements and settings.
Below is a table showing the various use cases in Trivore Identity Service regarding user account password.
| # | Initiator | Password change task |
|---|---|---|
| 1 | Password expires and new password must be defined during sign in | After successful sign in a dialogue requesting for a new password is shown. |
| 2 | Signed-in user account manually initiates password change | Open Personal Menu > Select Change password |
| 3 | Administrator enforces password change at next sign in | After successful sign in a dialogue requesting for a new password is shown. |
| 4 | Administrator manually changes the password, and sends it to user account via SMS and/or email | After successful sign in a dialogue requesting for a new password is shown. |
| 5 | New user account was created and a temporary password was set to it; policy demands for changing password during first sign in | After successful sign in a dialogue requesting for a new password is shown. |
| 6 | New user account was created and an unknown password was set to it; a password recovery email was sent to user for access to the account | This process is described in section 7.3 on page 27 below. |
Password change matrix.
Two-factor authentication (2FA)
Two-factor user account authentication considerably increases account security. 2FA is a secure and easy to use technology. As normal sign in only requires user name (something you are) and password (something you know), 2FA adds another factor: something you have.
Trivore Identity Service currently supports two different multi-factor authentication schemes. The more secure and preferred is based on TOTP (time-based one time password) <https://en.wikipedia.org/wiki/Time-based_One-time_Password_algorithm> and <https://tools.ietf.org/html/rfc6238>, protocol, and normally requires a smart phone application to generate (by default) a 6 digit number changing every 30 seconds. When TOTP-2FA is in use, this number is entered on a web browser or mobile application after username and password are entered during sign in to Trivore Identity Service.
The alternative 2FA is based on text messages. It is considered less secure, but it is still much more secure than using username and password alone. SMS 2FA is offered for those users who can not use TOTP 2FA. A code will be sent to your phone through SMS that you will have to enter to sign in.
Note, SMS 2FA may be disabled by administrative decision.
Next we will cover the steps to setup 2FA for your user account. Both TOTP and SMS are covered.
Setup TOTP 2FA
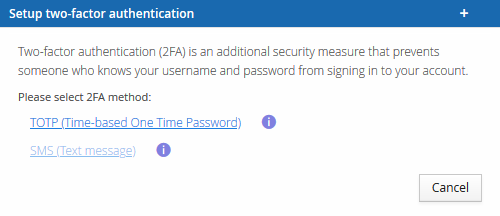
TOTP 2FA step 1
-
Open Personal Menu on the Top Bar.
-
Select “Setup two-factor authentication”.
-
Select TOTP (Time-based One Time Password)
TOTP 2FA step 2

-
On the dialogue “TOTP setup 1/2” there is information about the requirement of having an TOTP-compatible authenticator application installed. These applications are normally installed on a smart phone, but it is possible to install and use such applications on Linux, MacOS, Windows, or similar desktop operating systems. Please ensure you have installed the prerequisite application before continuing.
-
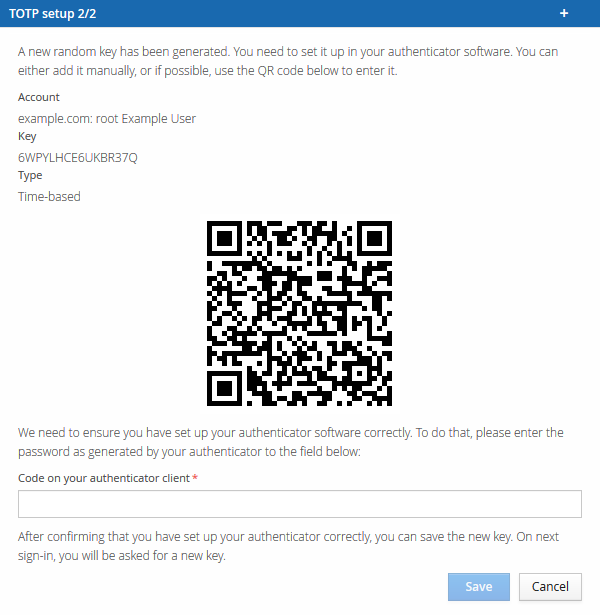
On the dialogue “TOTP setup 2/2” there is more information on how the 2FA is enabled. There is also a triplet of information: Account, Key, and Type. These are used for creating the secrecy for the 2FA. For convenience, you do not have to enter the Account or Key into your authenticator application. Instead there is a QR code on the dialogue that can be scanned with your smart phone.
-
After reviewing the dialogue and information on it, the next step is to open the authenticator application. You will now need to create a new entry into your authenticator application. You will have the option to scan a QR code or enter the information manually. If you select the QR code option the appliation will open the camera and you can point it at the generated QR code seen on the dialogue and it will automatically activate 2FA for your Trivore Identity Service user account. The device you are using for activation will now be a mandatory part of your sign in process.
-
If the authenticator application does not have camera functionality or you selected to enter the information manually, you will be asked to type in the Account and Key. It is easy (but not always safe) to do it using a clipboard.
-
Sign out of Trivore Identity Service.
-
Sign in again immediately to verify the 2FA functions as it should.
Setup SMS 2FA
Please note, it is preferred to use TOTP 2FA instead of SMS. It is also possible there are legal or corporate restrictions on using SMS-based 2FA. It is also possible that namespace administrators have disallowed the SMS-based 2FA for user accounts in the namespace.
-
Open Personal Menu on the Top Bar.
-
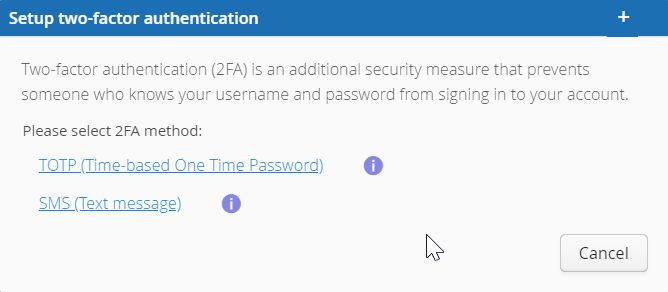
Select “Setup two-factor authentication”.
-
A popup dialogue will show up. Please select SMS (Text Messages). Please note that this option might not be available if you have not added your mobile phone number in account preferences.
-
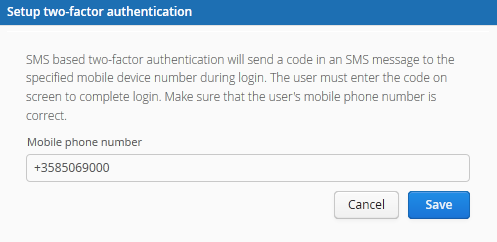
On the next dialogue there will be information about how SMS verification works. You will need to check that the mobile phone number saved to your account is correct. The mobile phone number shown here can only be changed in user preferences.
-
Sign out of Trivore Identity Service.
-
Sign in again immediately to verify the 2FA functions as it should.
Signing out
Selecting Personal Menu > Sign out is the only proper method to sign out from Trivore Identity Service. Signing out using this method ensures the service immediately recognizes you are no longer using the services. The sign out is also logged immediately for later audit purposes.
Warning! It is not possible to sign out by just closing the web browser application. Closing by default does not commence an immediate sign out from Trivore Identity Service. The signed in session will stay active until there is an account inactivity timeout. This is why it is important to define as short as practically possible inactivity timeout.
After a proper sign out, you will be immediately redirected to the sign in page.
If there are multiple sessions (browser tabs or windows) open for a single user account, all sessions will be signed out during sign out and redirected to the sign in page.
Main Pane
The Main Pane is the largest area on screen, and as stated earlier, the main application content is there. The content of Main Pane changes as different selections are made on the Main Menu (the Left Pane), so these two are tied together. More on that in next chapter.
The general layout of Main Pane is consistent within Trivore Identity Service. The top part of Main Pane is shown in the example above. It contains the following common sections, which can be seen on the image below.
Generally there will be two different kind of views in the Main Pane. A management view and an Editor view.