API documentation
You can find the up-to-date API documentation for your specific Trivore ID instance at:
https:{your-id-server}/apidoc
An example site is accessible here.
What's on the /apidoc page
The /apidoc landing page links to several separate references:
- Management API — the API this Developer Guide section covers, available as a Swagger UI site, a ReDoc site, and a downloadable OpenAPI document (see below).
- Permissions — the full list of internal permission codes supported by your instance (for
example
ACCOUNT_FINDorACCOUNT_EDIT), along with which permissions each one also grants. Useful when deciding which permissions to give a Management API Client or a custom role. - Error codes — a reference list of generic REST API error codes that can be returned in HTTP error responses, grouped by when they can occur (authentication, user validation, and so on).
- OpenID Connect — the current instance's OIDC discovery document (issuer, endpoint URLs, supported scopes and claims, and so on). See OpenID Connect for how Trivore ID implements the protocol.
- Preview APIs and Sign-In API [ALPHA] — early previews of APIs still under development; the Sign-In API is disabled in production instances.
Management API documentation forms
The Management API documentation is provided in several forms:
- Swagger UI site. It lets you browse and even call the APIs straight from your browser.
- ReDoc site. A read-only, more compact reference — a good option for just reading through the API rather than trying it out.
- An OpenAPI document. You can import it into your own tools, and even generate a client SDK based on it.
OpenAPI and Swagger
An OpenAPI 3.0 specification is automatically generated and is openly available. It can be browsed and tested with the Swagger UI tool. In the Swagger UI you can find links back to this documentation for more discussion on some of the topics.
It is also possible to test the APIs. Just select the button "Authorize" or click one of the lock buttons on the right to enter your API Client credentials.
Authorize
In the Swagger UI you can enter your credentials by clicking the Authorize button:

You'll then see a popup listing the available authorization schemes: Basic authentication with Management API Client credentials, or OAuth2 authentication with a user access token (which also lets you pick which scopes to request).
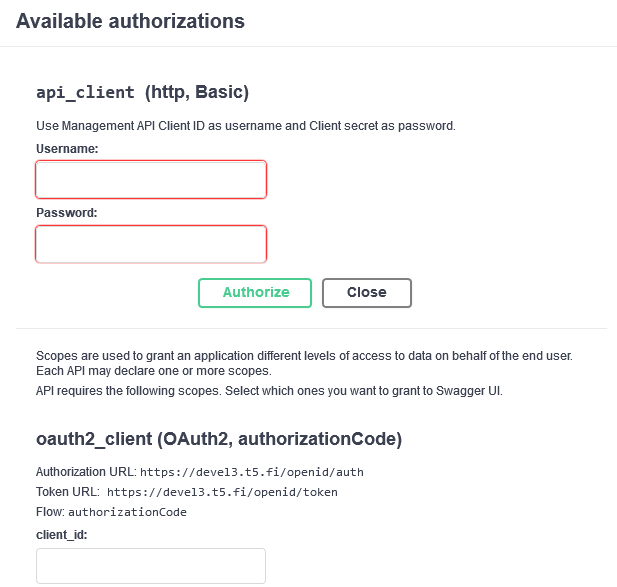
Once authorized, Swagger UI includes your credentials with every request you send from the "Try it out" button on an individual endpoint, until you sign out or close the popup and remove them.