Client Registration
You can configure your OIDC client registration by opening it in the Client Editor.
Registering a new client
In the OpenID Connect view, click Register new. You will be asked a few initial details about your client and given the Client ID and Client Secret values. You can then continue editing your client’s registration details.
Editing a client

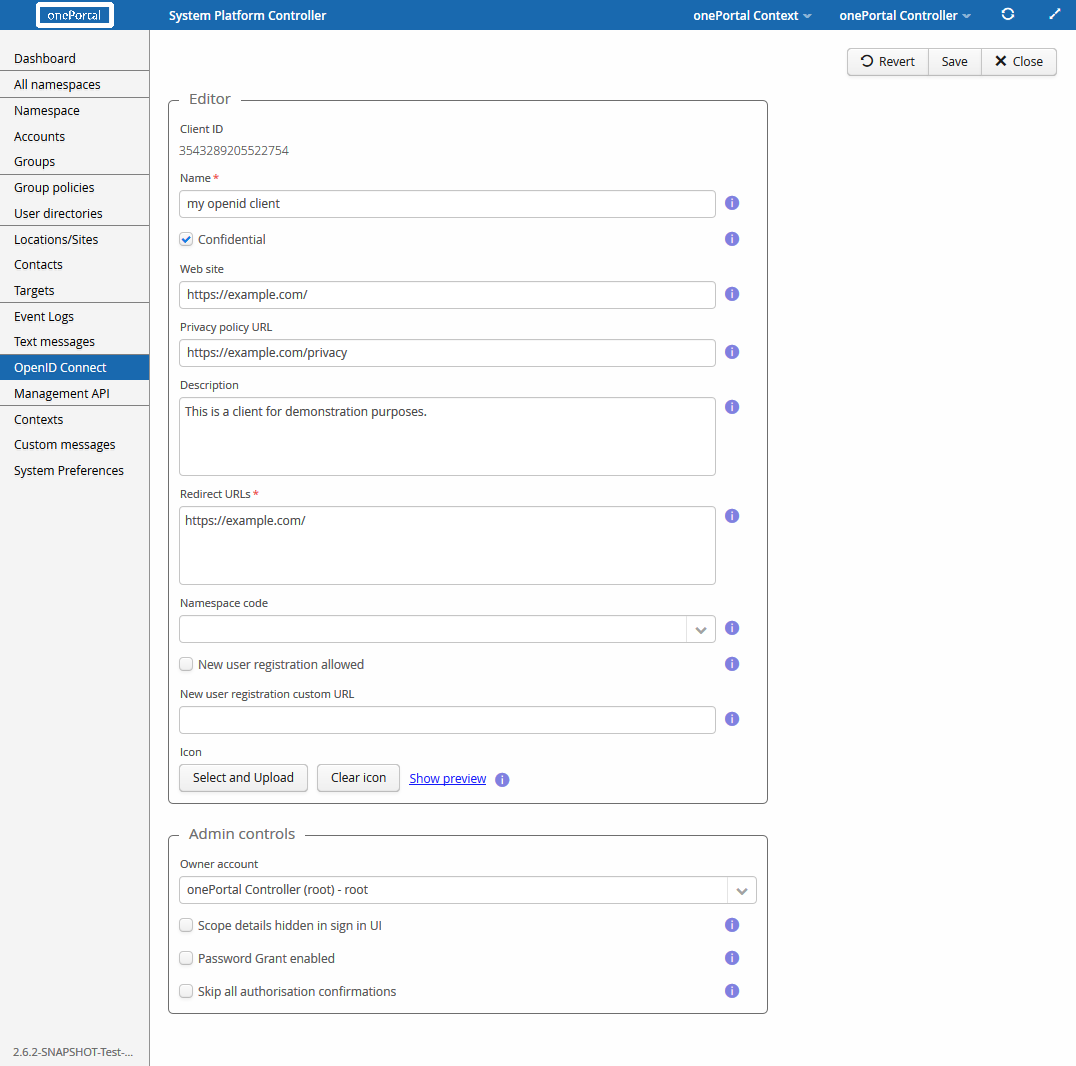
The first item in the editor is the client id. It will only be shown when editing an existing client configuration. For new clients the ID will be presented after saving the configuration.
The value in the name field defines the name of the client. Its value is shown to users during sign-in. The confidential option when checked lets the provider (onePortal) know that the client can keep the client secret protected. Typically only server hosted web apps are able to do this. Mobile clients, desktop apps and similar clients which would store the secret locally are not secure in this regard.
When the client is confidential, it is authenticated during the Authorization Code request. Public clients cannot be authenticated and it is up to the end-user, whether they trust the application.
The web site field is an optional, non-technical URL that links to the client web site. It may be shown to users during sign-in. Non-technical in this context means that the value is not directly related to the OIDC protocol or the authentication process but provides additional information to end-users.
The privacy policy URL is another non-technical URL that should point to a web site containing the privacy policy of the client. The URL given in this is shown to end-users during sign in.
The description field is meant for a short description of the client application. It may be shown to the user during sign in.
The redirect URLs is a required technical configuration value that must contain a list of allowed URLs where the client may be redirected after signing in. The OpenID Connect protocol specifies that the URLs must have "https" as the schema. The only exception to the rule is that when the host is 'localhost', 'http' schema may be used.
Make sure to configure the redirect URLs correctly as redirecting users to malicious web pages will leak the access token. Additionally the in the implicit grant flow the redirect URL is part of the request validation. Additionally in the implicit grant flow the redirect URL is part of the request validation. The page where the user is redirected is ultimately selected by the client, validated by the provider and it should collect and validate the values sent by the provider.
If the 'new user registration custom URL' is defined, the 'register new
account' button in OAuth login view is always visible regardless of
value of 'New user registration allowed' and opens this URL. Add
template parameters ({clientName}, {clientRedirectUri}) to URI in
desired locations (such as a query parameter) if you want to pass
information.
Additionally, the client may have an icon that is shown to end-users during sign-in.
Admin controls are additional settings related to the client. The owner account field specifies the user, who is considered to be responsible for the behavior of the client. The owner of the client will also work as a contact person regarding the client.
The scope details hidden in the UI option sets whether scope (including claims) details should be hidden in sign in user interfaces. It is against good practices to not show the scopes during sign-in, but there may be some special cases when enabling this option is justifiable.
Checking the password grant enabled checkbox allows the use of the OIDC password grant flow. It is recommended that 3rd party clients are not given access to this type, as it gives them access to the user password. The password grant flow is mainly meant for legacy application adopting OIDC.
If selected, the skip all authorization confirmations option, skips all post-authentication user confirmations about giving the client access. This should only be enabled for strongly trusted clients, such as those controlled by the identification service (i.e. the onePortal instance) owner.
Compatibility modes
Some OpenID Connect recommendations can be overridden with the compatibility mode settings.
| Compatibility mode settings | Effect |
|---|---|
| Locale claim | Changes the syntax of the locale claim value. Default syntax is a BCP47 language tag (for example en-US). Other options are Java-style (en_US) and language-only (en). |
Customising the authorisation / sign-in view

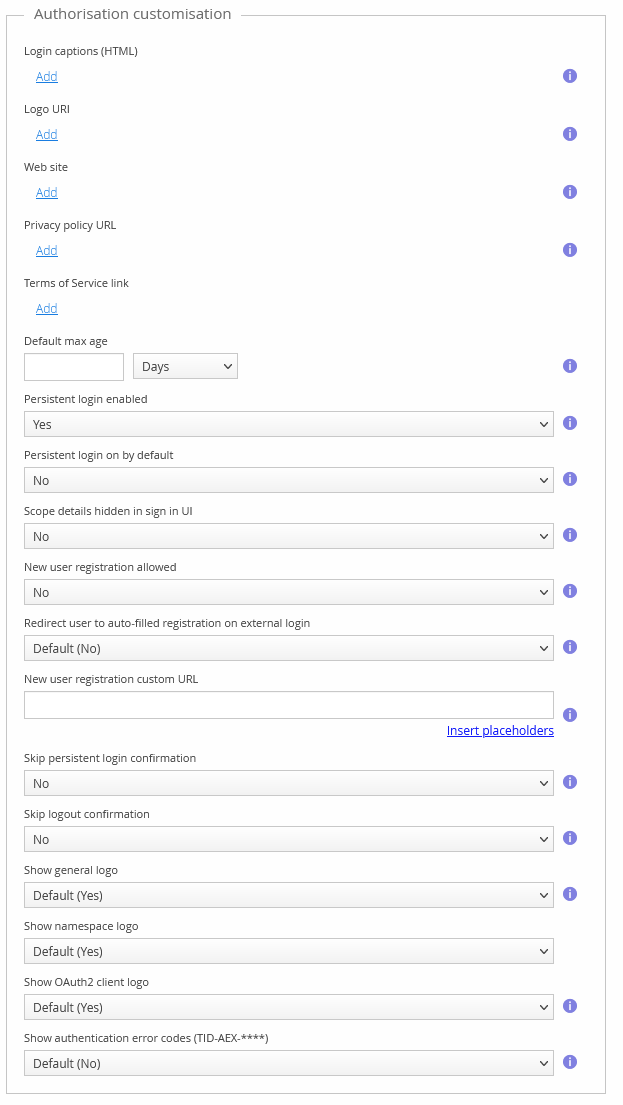
New user registration allowed
You can select if new users can be registered in the authorisation view. Registration will be done using the built-in registration form, or by linking to an external registration page.
New user registration custom URL
If you have implemented an external web page where users are expected to perform the registration, you can enter the URL to this page here. When the user clicks “Register a new account” in the authorisation view, they will be redirected to this URL.
Leave empty to use the built in registration form.
Restricting who can sign in to your application

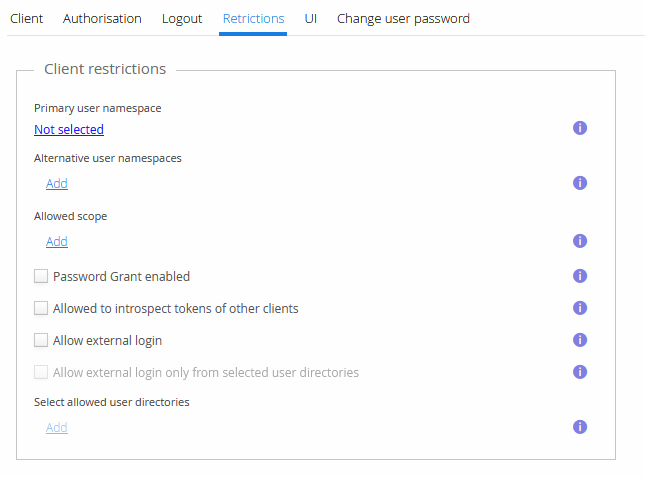
By default any user in the identity service can sign in to your application. You can limit this by configuring which namespaces users are allowed to come from.
Primary user namespace
The primary namespace defines where new user registrations are done. Users in this namespace can also sign in. If the primary namespace has not been selected and no alternative user namespaces have been selected, users can sign in from any namespace.
Alternative user namespaces
You can add alternative namespaces from which users can sign in from. New user registration is not possible in these namespaces. If no namespaces have been selected and no primary namespace has been selected, users from all namespaces can sign in to your application.